

How To Use Camera On Lumix
Panasonic Lumix Operating Guide
From Help Wiki
Jump to:navigation, search
A Proficiency Test is Not required to check out these cameras
Contents
- 1 Precautions
- two Basic Operations
- 2.one Switching betwixt shooting mode and playback
- ii.2 Shooting Modes
- 2.ii.1 Intelligent Auto
- 2.2.2 Normal Picture Mode
- 2.2.3 Scene Mode
- 2.2.four Motion Picture Mode
- 2.3 Image and Picture show Resolution
- ii.iii.ane Changing Resolution
- 2.4 Battery Ability
- 2.five Playback
- two.five.1 Viewing Images on a Television set Monitor
- 2.six Transferring Images to a Computer
- 3 Resetting Defaults
- three.i Formatting the Retentivity Carte du jour
Precautions
- Do not aim the camera directly into the lord's day or other intense light sources.
- Practice not immerse camera in liquid or let to get wet.Wipe dry with soft, absorptive material if outside contacts liquid or salt air.
- Do not employ, place or store in direct sunlight or in places subject to high temperatures such every bit the dashboard or torso of a car.
- Practise not place camera on speakers, electrical motors or other equipment generating strong electromagnetic fields.
Basic Operations
-
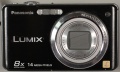
Front of the Lumix
-
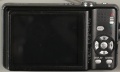
Dorsum of Lumix
-
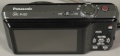
Top of Lumix
Switching betwixt shooting mode and playback
To enter shooting fashion slide the [REC]/PLAYBACK] selector switch to the camera icon. To view images, slide the way switch to the play icon.
Shooting Modes
Intelligent Auto
- The camera will set the nigh appropriate settings to match the subject and the recording conditions so we recommend this mode for beginners or those who want to leave the settings to the photographic camera and take pictures easily.
-
- The Following functions are activated automatically.
- Scene detection/[STABILIZER]/Face Detection/Movement Detection/Backlight Compensation/Digital Red-eye Correction
-
- Press the [IA] button on the top of the photographic camera.
- Press the shutter push halfway to focus.
- Printing the shutter button fully to take the moving-picture show.
Normal Flick Way
- The camera automatically sets the shutter speed and the aperture value according to the effulgence of the subject.
- Y'all tin take pictures with greater liberty by changing various settings in [REC] menu.
- Press [MODE]
- Press [UP]/[Down] arrows to select [NORMAL PICTURE], and the press [Card/SET].
- Aim the AF area at the point you want to focus on.
- Printing the shutter push halfway to focus.
- Press the shutter button fully to have a picture.
Scene Manner
- When yous select a Scene Fashion to match the subject and recording situation, the camera sets the optimal exposure and hut to obtain the desired picture.
- Press [Fashion]
- Printing [UP]/[DOWN] arrows to select [MS] ([My Scene Mode]), and then press [Carte/Prepare].
- Press [Upwardly]/[DOWN]/[LEFT]/[RIGHT] arrows to select the Scene Mode.
- Press [MENU/SET] to set.
-
-
- If you press [Display] when selecting a Scene Mode, explanations about each Scene Mode are displayed. (If yous press [DISPLAY] over again, the screen returns to the Scene Way menu.)
-
Movement Picture Mode
- Press [MODE]
- Press [Upward]/[Downwards] arrows and select [MOTION Movie], and and so printing [MENU/SET].
- Press the shutter push button halfway to focus and then press fully to start recording.
- Printing the shutter push fully to terminate recording.
Image and Movie Resolution
Image resolution and aspect ratio varies depending on camera settings.
Changing Resolution
- Printing [MENU/SET]
- Press [Upwardly]/[DOWN] arrows to select PICTURE SIZE and so press [MENU/SET].
- Press [UP]/[Downwardly] arrows to select the picture size you would similar to use and then press [MENU/SET] to select.
- Press [Carte/Fix] to exit out of the bill of fare.
-
- In general the finer the resolution, the larger the file size. Keep this in listen when considering how many pictures or movies y'all need to capture.
Battery Power
The Panasonic Lumix comes with ii rechargeable batteries. To charge the batteries plug in the battery accuse to a wall outlet and insert bombardment. Charging takes approximately 100-130 mins.
-
- Media Loan does not charge batteries prior to check out.
- Always accuse the batteries when you bank check out the camera.
Playback
Slide the mode switch to the play icon, and using the [Upwards]/[DOWN]/[LEFT]/[Correct] buttons to motion between images.
Viewing Images on a Television Monitor
- Connect the AV cable (supplied) to the video input and the audio input sockets of the Goggle box.
- Connect the AV cable to the [AV OUT] sokcet on the photographic camera.
- Plow the Television on and select external input.
- Plough the camera on.
- Note: Depending on the [Pic SIZE], black bands may exist displayed on the top and lesser or the left and right of the pictures.
Transferring Images to a Figurer
- Connect the photographic camera to a PC/MAC via the USB connectedness cable (supplied).
- Printing [Upwardly]/[DOWN] to select [PC] and the press [Carte/SET]
- Double-click on [Removable Disk] in [My Computer]. (When using a MAC, the drive is displayed on the desktop.)
- Double-click [DCIM] binder.
- Using a drag-and-drop performance, move the pictures y'all want to acquire or the folder storing those pictures to whatsoever unlike binder on the PC/MAC
Resetting Defaults
After you lot're washed using the Lumix, please return the settings to their default values.
- Printing the [MENU/Prepare] push.
- Press the [Left] push button and then the [Downwards] to select the settings menu (looks similar a wrench).
- Press the [Upwards]/[Downwards] buttons to select RESET and press the [Right] button to access.
- Press the [UP] push to select YES so press [MENU/SET] to reset, this step is done twice.
Formatting the Retentiveness Card
- Press the [Carte du jour/Set up] button.
- Press the [Left] button and so the [Downwards] to select the settings bill of fare (looks similar a wrench).
- Press the [UP]/[Down] buttons to select FORMAT and press the [Correct] push to access.
- Press the [Upward] button to select YES and and so press [Bill of fare/SET] to format.
-
- You should format the retentivity menu at bank check out and earlier returning the photographic camera to ensure the retention card is empty.
Delight Note: If the Camera is malfunctioning or not working, please DO NOT ATTEMPT to set up the trouble yourself. Take information technology back to Media Loan and discuss the problem with a media loan staff member.
DO Not clean the camera using thinners, benzine, Synthetic cleaning substances or water. All above substances may distort or damage photographic camera.
Source: https://helpwiki.evergreen.edu/wiki/index.php/Panasonic_Lumix_Operating_Guide
Posted by: schofieldnamon1996.blogspot.com
0 Response to "How To Use Camera On Lumix"
Post a Comment